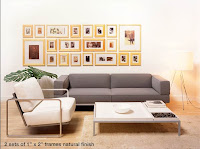
Some pre-made or pre-designed picture walls can cost anywhere from $100 - $350 for the template plus frames! The picture wall I am making today only cost me $30. That's a deal!!
This photo is what inspired me:
Materials:
1. Frames. You can use any shape, color or size. Michael's, Dollar Tree and IKEA are great places for inexpensive finished and unfinished frames. I bought my unfinished wood frames from IKEA and Michael's, all for about $1 each. I am using a total of 15 frames that are a combination of 5" x 7" and 4" x 6".
2. Spray Paint. Any color will work, I have chosen black. I recommend Krylon Indoor/Outdoor Satin. I bought mine at JoAnn Fabric Superstore with my 40% off coupon, but it's much cheaper at Home Depot, and they have a larger selection of colors.
3. Primer. You will need a primer for unfinished frames. I used KILZ Interior Oil-base white primer. You can buy this at Home Depot or Lowe's for about $3 - $5.
4. Nails. I have chosen #17 - 1" Wire Nails by Crown Bolt, from Home Depot, but you can use any sort of nail you choose. Only $1.24!


1. Lay down rags or a towel thatyou don't mind ruining onto the ground outside. If you are a novice spray painter, you will probably want to wear something that can be ruined also.
2. Take the glass and backing out of the frames, leaving the prongs up to elevate the frames a little off the ground. (This will help when you spray the sides of each frame)
3. Arrange the frames on the towel about 4" apart.
4. Shake the primer can vigorously for about 45 seconds with the cap on.
5. Before spraying, test the primer on a little spot on the towel, to make sure to get an even spray and to get a feel for how it comes out.
6. Spray each unfinished frame with a light coat of primer, holding the can about 6 - 8" from the frame. Use a quick sweeping motion while spraying. *You do not need to prime frames that are already painted or finished.
7. Let frames dry about 40 minutes.
8. Shake the spray paint can vigorously for about 45 seconds with the cap on.
9. Again, test the paint on a small area of the towel to ensure that the paint comes out evenly.
10. Spray each frame with a light coat using a sweeping motion, holding the can about 6" away. Make sure to spray each side of the frames, as well. It's okay if the frame is not completely coated. It's better to do a lot of very light coats, that way your paint doesn't glop or become gummy. You will probably need to do 4 or 5 coats, depending on the color you chose. Allow about 30 - 60 minutes to dry between coats. After last coat, let dry overnight.
11. Once frames are dry, (the next day) bring them inside and lay them out on the floor or on a table near the wall where you will be putting them up. But the frame back together and insert the photo of your choice.
12. Arrange the frames into the grouping that you would like them on the wall.
13. Start with one of the frames that is to be on the perimeter. Hammer the nail into the wall, and hang that frame. Working inward, hang all your frames. Don't be afraid if you make a mistake, you should be using small nails, and nail holes are easy to paint over! :)
14. Voila! You have a picture wall. You can always add on, or rearrange the pictures.
(I'll post pictures of my finished product tomorrow, hopefully!)
Also, if you're like me and are really slow about printing out your pictures, you can use a nice piece of scrapbook paper as a place holder. I bought a few sheets at Michael's on sale for .25 each that match my living decor, and are fancy enough that it doesn't just look like plain paper. You can also decoupage your scrapbook paper before framing it, creating a shiny, textured look. I recommend Mod Podge Satin decoupage, with a sponge brush.
A good snapshot stops a moment from running away.
~Eudora Welty
~Eudora Welty


No comments:
Post a Comment